A Primer on AI-Coding in 2026
- Jack Norrie
- Software engineering
- 10 Feb, 2026
Introduction
I have been using AI-coding tools for several years at this point. As is the case with many, my journey started with AI chatbots via web interfaces. I found these tools useful at the time. However, I didn’t feel they greatly expanded my toolkit. Primarily, these tools added a convenience factor, to what would have been reading through several Stack Overflow posts and pages of documentation. I already knew how to implement the features I was working on, so the code snippet examples offered little value.
Things started to change with the advent of Cursor, which moved these chat interfaces into your IDE. With the context of your projects, AI agents could suggest the exact changes which needed to occur in your project in order to meet your requirements. Compared to the previous paradigm, where you would have to translate the proposed changes into your codebase, this represented the potential for a true speed-up. Indeed, I readily adopted this paradigm into my workflow, adding plugins like Avante and Windsurf to my NeoVim configuration to replicate this functionality. However, as time progressed I felt myself using these plugins less and less. I was finding that the time and effort invested into reviewing and modifying outweighed any potential speed benefit I might be gaining. It also simply was not an enjoyable experience, this type of workflow was still very synchronous, and the process felt akin to micromanaging a junior developer, having to eagerly course correct them as soon as you spotted them going down a bad path.
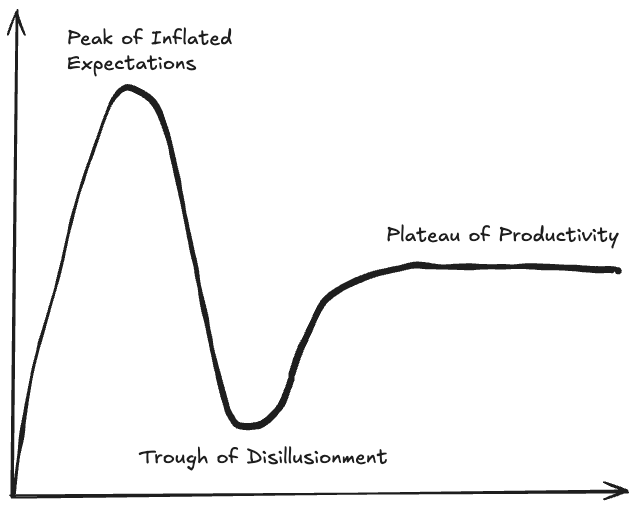
At this point I had reached the “trough of disillusionment” of the AI-Coding hype cycle, these tools had been relegated to the realm of advanced auto-complete and project exploration. I had heard about tools like Claude Code in early 2025, but I did not so eagerly adopt them this time. This changed in August 2025 when I saw a video of someone using OpenCode, an open source alternative to ClaudeCode, in a tmux setup very similar to my own. This immediately drew my attention. OpenCode added many features which were missing from my previous workflows. One of the most useful features at the time was that it allowed you to quickly switch between a “plan-mode” (no edits) and a “build-mode” (edits), a feature which is now commonplace among the popular CLI AI-coding tools.
I am a big proponent of the Unix philosophy, i.e. using tools that “do one thing and do it well”. Hence, I found this setup of a specialised Code Editor (Neovim) + specialised AI-Coding tool (OpenCode) preferable to trying to turn my NeoVim setup into a Swiss Army knife, that ultimately ends up being suboptimal in each of its respective sub-functions. Additionally, designing workflows using specialised tools enables you to adapt your workflows with more ease. For example, as AI-coding tools kept improving, I was finding that I could request larger features from these coding tools and trust them to produce reasonable outputs. Naturally, my workflow shifted from editing AI-outputs to reviewing AI-outputs. However, I was able to quickly adapt to this shift by becoming proficient with LazyGit, which I have found an excellent addition to my current Generate (OpenCode) - Review (LazyGit) - Edit (NeoVim) stack. Indeed, I believe the current popularity of AI-Coding CLIs is a phase, many developers find the CLI intimidating, and therefore the barrier for entry for these tools is too high for mass adoption. I believe the next wave of successful mainstream AI-Coding IDEs are going to be IDEs which refine the UX for the “Generate” and “Review” component of the above workflow, with the “Edit” functionality being of secondary importance. This being in contrast to Cursor, which in my opinion, is an “Edit” focussed IDE.
This setup was working great for several months. That is until early January, when Anthropic revoked OAuth access to Claude, preventing me from using my Claude Pro subscription inside OpenCode. Being locked into a yearly Claude Pro subscription, I decided to give Claude Code a try. However, I simply didn’t like the interface as much. Additionally, I previously did not encounter many problems with rate limiting. However, when using the same Claude Pro plan with Claude Code I felt I was getting rate limited on a daily basis. The nail in the coffin was when OpenAI announced that you would be able to access Codex via OAuth for a ChatGPT Pro subscription.
OpenAI allowing me to use their models inside OpenCode solved my immediate problem. However, my interest had now been piqued: “Why did my experience with these two CLI tools feel so different, despite them using the same models?” This prompted a journey into understanding these tools better and dialling in my AI workflows further. The following article is a summary of all the things I have learnt over the last month relating to CLI AI-Coding tools, in particular OpenCode.
Background
I am going to use the following section to introduce some relevant terms which will be used throughout the rest of the article.
LLM
For the sake of this article I will not be going into detail about how an LLM works (Tokenisation, Embeddings, Transformers, Attention, RoPE, MLPs …). For the purposes of this article, the following definition will suffice: An LLM is a program/model that takes in some input (context) and returns a response.
response = model.generate(context)Harness
An LLM harness is a program that can be used to interface with an LLM, usually via API calls. Some examples of AI harnesses include OpenCode, Claude Code and OpenClaw.
Agent
I particularly like Simon Willison’s definition for an AI-Agent, he succinctly defines an agent as:
An LLM agent runs tools in a loop to achieve a goal. [1]
My interpretation of this definition is detailed in the following code:
# agent.py

def chat(model: Model, context: list[str]) -> list[str]:
 while True:
  response = model.generate(context)
  context.append(response.content)
  print(context[-1])

  if response.terminate:
   return context

  for tool_call in response.tool_calls:
   tool_result = execute_tool(tool_call)
   context.append(tool_result)

if __name__ == "__main__":
 user_prompt = sys.argv[1]
 model_name = sys.argv[2]
 agent_name = sys.argv[3]

 model = get_model(model_name)
 system_prompt = model.get_system_prompt()
 agent_prompt = get_agent_prompt(agent_name)

 context = [system_prompt, agent_prompt, user_prompt]
 while True:
  context = chat(model, context)

  user_prompt = input()
  context.append(user_prompt)
The above allows the configuration of different agents via modifications to the initial context, i.e. injecting an agent prompt. This aligns with how many AI-Coding harnesses implement agents.
One could then interface with this agent as follows:
python agent.py "Hello agent, this is a demo prompt" "Model42" "Assistant"Which mirrors the general pattern for CLI AI-Coding harnesses:
harness <prompt> <model> <agent>Prompt Engineering
Prompt Engineering refers to the task of optimising the user-prompt, i.e. instructions that you pass to an LLM. As with many machine learning systems, the adage of “Garbage In Garbage Out” (GIGO) very much applies within the context of prompt engineering.
When interacting with Claude, think of it as a brilliant but very new employee (with amnesia) who needs explicit instructions. Like any new employee, Claude does not have context on your norms, styles, guidelines, or preferred ways of working. The more precisely you explain what you want, the better Claude’s response will be. [2]
When tackling a problem it is easy to forget just how much context we enter a problem with. Indeed, a lot of this context will be buried in our long term memory and only surface midway through solving a problem. You need to understand that your LLM is going into these problems with a blank slate. It is therefore pertinent to supply your LLM with as much of this context that you are taking for granted as possible. The following are some key components that I try to include in all of my prompts:
- Description - Give a detailed description of the task you want completed
- Workflow - Does this task fit within some broader workflow? Which steps are before it? How will its output be used?
- Examples - Give some examples of what the correct output should look like
- Audience - Who is the target audience for this result
All of the above information helps your agent craft a response that fits your requirements better.
Plan/Build ModeIn my personal workflows, I will always break implementing a feature into two stages: A planning stage and a building stage. The purpose of the planning stage will be to have a discussion with an agent about a feature I want to develop. Once this discussion is finished I will ask the agent to output a detailed plan to a specs/ markdown file. This plan then serves as a well crafted initial prompt for a new builder agent coding session. As will be seen in the context engineering section, there are many advantages to maintaining a high signal-to-noise ratio in the builder’s context window. Additionally, by splitting the workflow up like this, you are able to roll back the builder’s changes if its implementation didn’t work, refine your plan, and then start a new builder session with the refined plan.
Context Engineering
Definition
Context Engineering can be seen as a successor to prompt engineering. Rather than solely focussing on the input to our agent, context engineering focusses on how to effectively utilise and populate the context window of an agent throughout its problem solving journey. In this sense context engineering is about effectively curating what context to present to your agent from a knowledge base of possible context. However, this then begs the question, when possible, why not load the entire available knowledge base into context?
Research
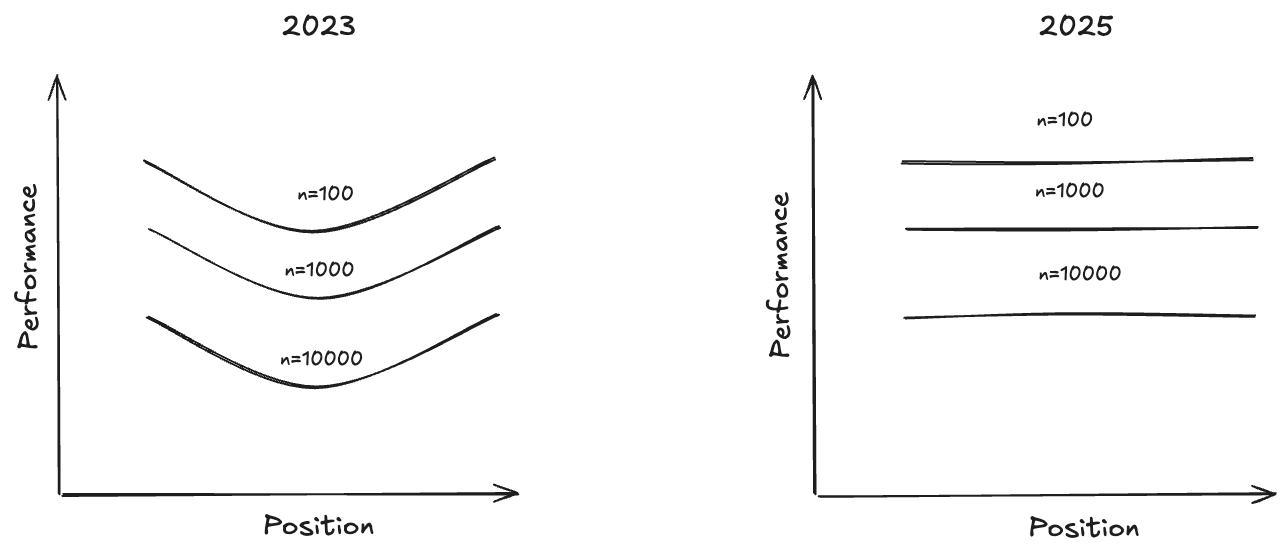
The seminal paper “Lost in the Middle” (20/11/2023) [3] showed that LLMs have the highest retrieval performance, when using Needle In A Haystack (NIAH) benchmarks, at the start and end of their context windows. In other words, models have a primacy and recency bias. As well as advocating for proper engineering of the position of your information within your context window, the paper also highlighted the important trade-off of providing your language model with sufficient information to complete its downstream tasks, without adding too much information as to overwhelm its context. They showed that in a reader-retriever benchmark that reader performance saturates much faster than retriever performance, meaning that the reader gets diminishing returns as retrieval improves.
A more recent technical report “Context Rot: How Increasing Input Tokens Impacts LLM Performance” (14/07/2025) [4] opens stating that frontier models are now flattening the performance curve for NIAH tasks, which has emboldened LLM providers to develop models with ever larger context windows. However, the article goes on to stress that NIAH are overly simplistic retrieval tasks. As such, the article investigates semantic NIAH tasks, i.e. tasks where the needle is semantically similar to the query rather than lexically similar. It found that although the positional performance u-curve had been flattened for such tasks, the performance as a functional of context length still showed drastic drop-offs with increasing context length. Additionally, this drop-off accelerated as query and needle semantic similarity decreased. Furthermore, it showed that primacy bias still existed in some experiments, such as the “repeated words” experiment. Finally, the article did extensive experiments on the role of “distractors” within the context, i.e. pieces of information that have semantic overlap with the objective, but do not actually answer the objective. The article found that distractors have a non-uniform impact on performance, i.e. cause more degradation in performance as the context grows.
Principles
I believe the newer context rot article is much more relevant to coding. Indeed, you are usually making queries in English about code context, i.e. highly semantically dissimilar entities. Therefore, I have concluded the following guiding principles, roughly ordered by importance, from these pieces of research:
- Maximise context signal-to-noise - Your context window should be as long as required to convey the information needed to complete a task and no longer
- Minimise distractors - You should avoid adding pieces of information to your context that are semantically similar to useful information, yet do not actually help in solving your task
- Maximise semantic similarities - Help you model retrieve useful context by telling it what functions/classes/paths you are specifically interested in within your codebase
- Take advantage of primacy and recency bias - This is only weakly supported by newer research. Nonetheless, I think this is a good heuristic to keep in mind. This is because I believe humans have this bias, and therefore the model’s training data will also likely have this bias.
Context Window Scaling
You might argue that the above scarcity mindset around context window usage is a short term problem, as time goes on we will surely get models that can handle effectively unlimited context windows. However, a core aspect of the transformer architecture is the attention mechanism. Fundamentally, this mechanism calculates the pairwise importance between all pairs of token embeddings. Therefore, barring a significant architectural change in state-of-the-art LLMs, the computational scaling with context size is
Context Window Anatomy
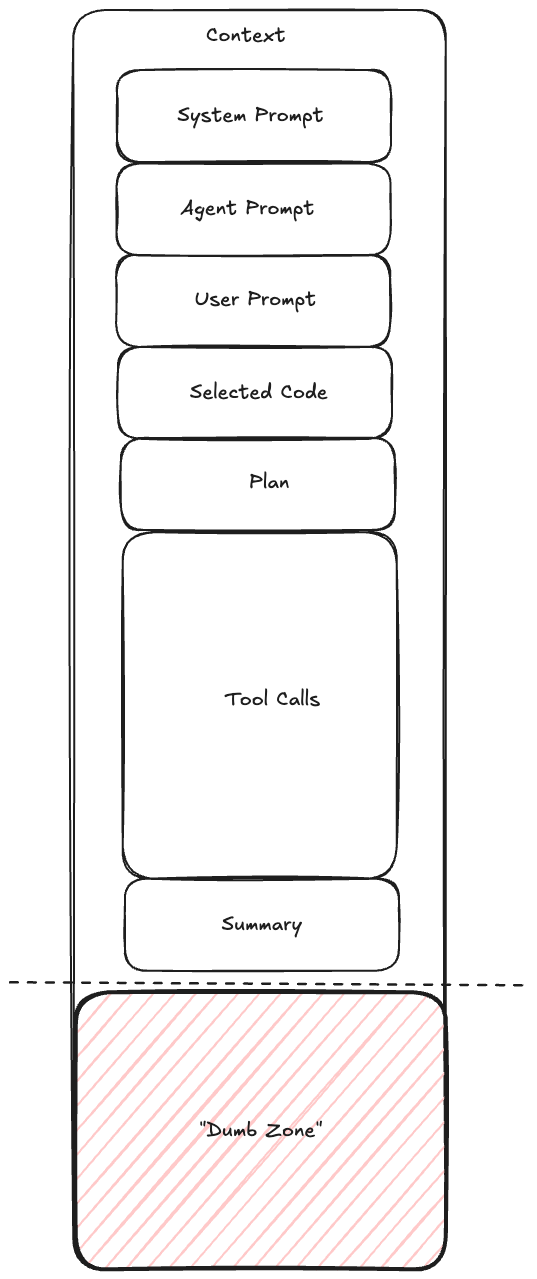
If we are to optimise the size of our context window it is worthwhile diving into the anatomy of a typical context window. Typically an AI-Coding session will involve the agent being initialised with some system prompt followed by an agent specific prompt. Then a user prompt will be used, which could then make references to parts of the codebase, which will then be loaded by the agent into context. Next, the agent will have a discussion with the user to formulate an implementation plan. After confirming the plan the agent will iteratively use tools to solve the task at hand, before finally summarising their work. Your objective as a context engineer is to ensure that this summarisation is done before a point of significant performance degradation, the region after this point is referred to by many practitioners as the model’s “dumb zone”.
Context as a Scarce ResourceYou need to think about your context window as a scarce resource. For reference, a 200k token context window corresponds to a similar amount of space as the memory available on a commodore 64. Therefore, similarly to how games programmers of that era were meticulously crafting memory optimised code, you too must optimise the usage of your context window. [5]
Reduce and Delegate
At a high level all context engineering techniques fall into either a method of reducing context or delegating context somewhere else, as not to pollute the current context window. Throughout this article several examples of such techniques will be highlighted. [6]
Harness Components
The following section will detail the configuration components available within common AI-Coding harnesses. Additionally, relevant context engineering techniques will also be highlighted within each of these components. Most of these components are configured as markdown files within some ~/.harness directory. Additionally, most harnesses let you override definitions with project specific definitions which are loaded in from your projects current working directory, e.g. <project>/.harness.
Tools
Tools are programs that your agent runs on your local machine. They are a core part of an agentic workflow, they are what an agent invokes in their “loop” to achieve their goal. Most harnesses will come packaged with standard tools for reading files, writing files, and executing shell commands. However, they will also typically give you the ability to define your own tools. Importantly, tools are deterministic, which means they are a useful tool for when you want predictable outcomes.
Schema BloatUpon initialisation your agent will load all its available tools into its context. It uses the tool description to decide when to use the tool. However, alongside a description tools also load their input/output schemas into context. This can represent a significant amount of context if you have hundreds of tools that you are making available to your agent. As such, adding tools that your agent does not need can lead to deleterious effects to your agent’s performance
VerbosityWhen designing tools you should set the verbosity level for the printouts and return summaries for your tool appropriately. Avoid tools that give verbose, low signal-to-noise ratio, printouts. Test-runners are particularly notorious for this problem, you should configure them to only print out failing tests.
Slash Commands
Slash commands are simply re-usable prompts that you can invoke by typing /<slash_command> into your harness. However, the true power of slash commands comes about when you understand them as composable prompting units, i.e. you can reference slash commands in the definitions of other harness components such as skills and agents.
Slash commands also offer an avenue for a context engineering reduction pattern. A common pattern amongst AI-coding practitioners is to make use of a <harness>.md file, i.e. a file that gets automatically loaded into context upon agent initialisation. Rather than having a large <harness>.md file which likely contains a lot of irrelevant context for your current problem, it is a better idea to break your <harness>.md file into slash commands and only invoke the slash commands which are relevant for your current problem into context at the start of your prompting session, this is called context priming.
Skills
Skills are a relatively new addition to the context engineering toolkit. They are reusable filesystem based resources which extend your agent’s capabilities. They go beyond slash commands in the sense that they can utilise your agent’s VM environment to execute scripts. Therefore, where a slash command might be configured via a single markdown file, a skill will usually be packaged as a directory, potentially containing many markdown files and scripts.
One of the key principles of skills is that they operate under a progressive disclosure model. This means they attempt to achieve “Just-in-Time” context loading, i.e. only loading in context as and if it is needed. In practice this means that skills will be defined with some top level <skill>/SKILL.md file. This skill file will contain metadata (yaml frontmatter), instructions (markdown body) and might make reference to other resources in the skill directory. The progressive disclosure model then only loads in this data as follows:
- metadata - Loaded on agent initialisation, this will contain a description for when the skill should be used
- Instructions - This will be loaded if at some point in the agent’s task journey it encounters a task that it thinks meets the skill description
- Resources - Additional resources, like markdown files and scripts, might be referenced in the instructions, the agent can decide whether to load these resources into context depending on its current task
Onboarding DocumentWrite skills the same way you would write an onboarding document for a new member of your team. When writing a skill you should run the litmus test: “Could a new member of my team achieve use the information contained in these instructions to achieve the desired goal?”
Agents
As was stated in the background section, an agent serves as a modification to your model’s system prompt. Harnesses usually allow you to configure agents as markdown files, whose content gets appended to your model’s system prompt at the start of a conversation. In some sense, agents sit at the top of the prompt compositional hierarchy, i.e. agents can be composed (make reference to) both slash commands and skills.
Primary Agents
Primary agents are the agents that users directly interface with.
Sub Agents
Sub-agents are agents that primary agents interface with, this is a useful tool for your primary agent since it allows the primary agent to delegate work. Importantly, sub-agents get their own isolated context window. This gives the sub-agent a space for intermediate context, i.e. thinking and tool calling. Then, once a sub-agent has completed its task, it returns only a high level summary of the result back to the primary agent. This helps maintain a high signal-to-noise ratio in the primary agent’s context window, ensuring that the primary agent does not enter the “dumb zone”. With this in mind, I believe that defining agents as specialists at a specific task is a much better idea than the conventional approach of defining agents as a specialised job role, i.e. prefer “Planner”, “Builder”, “Tester” over “Software Engineer”.
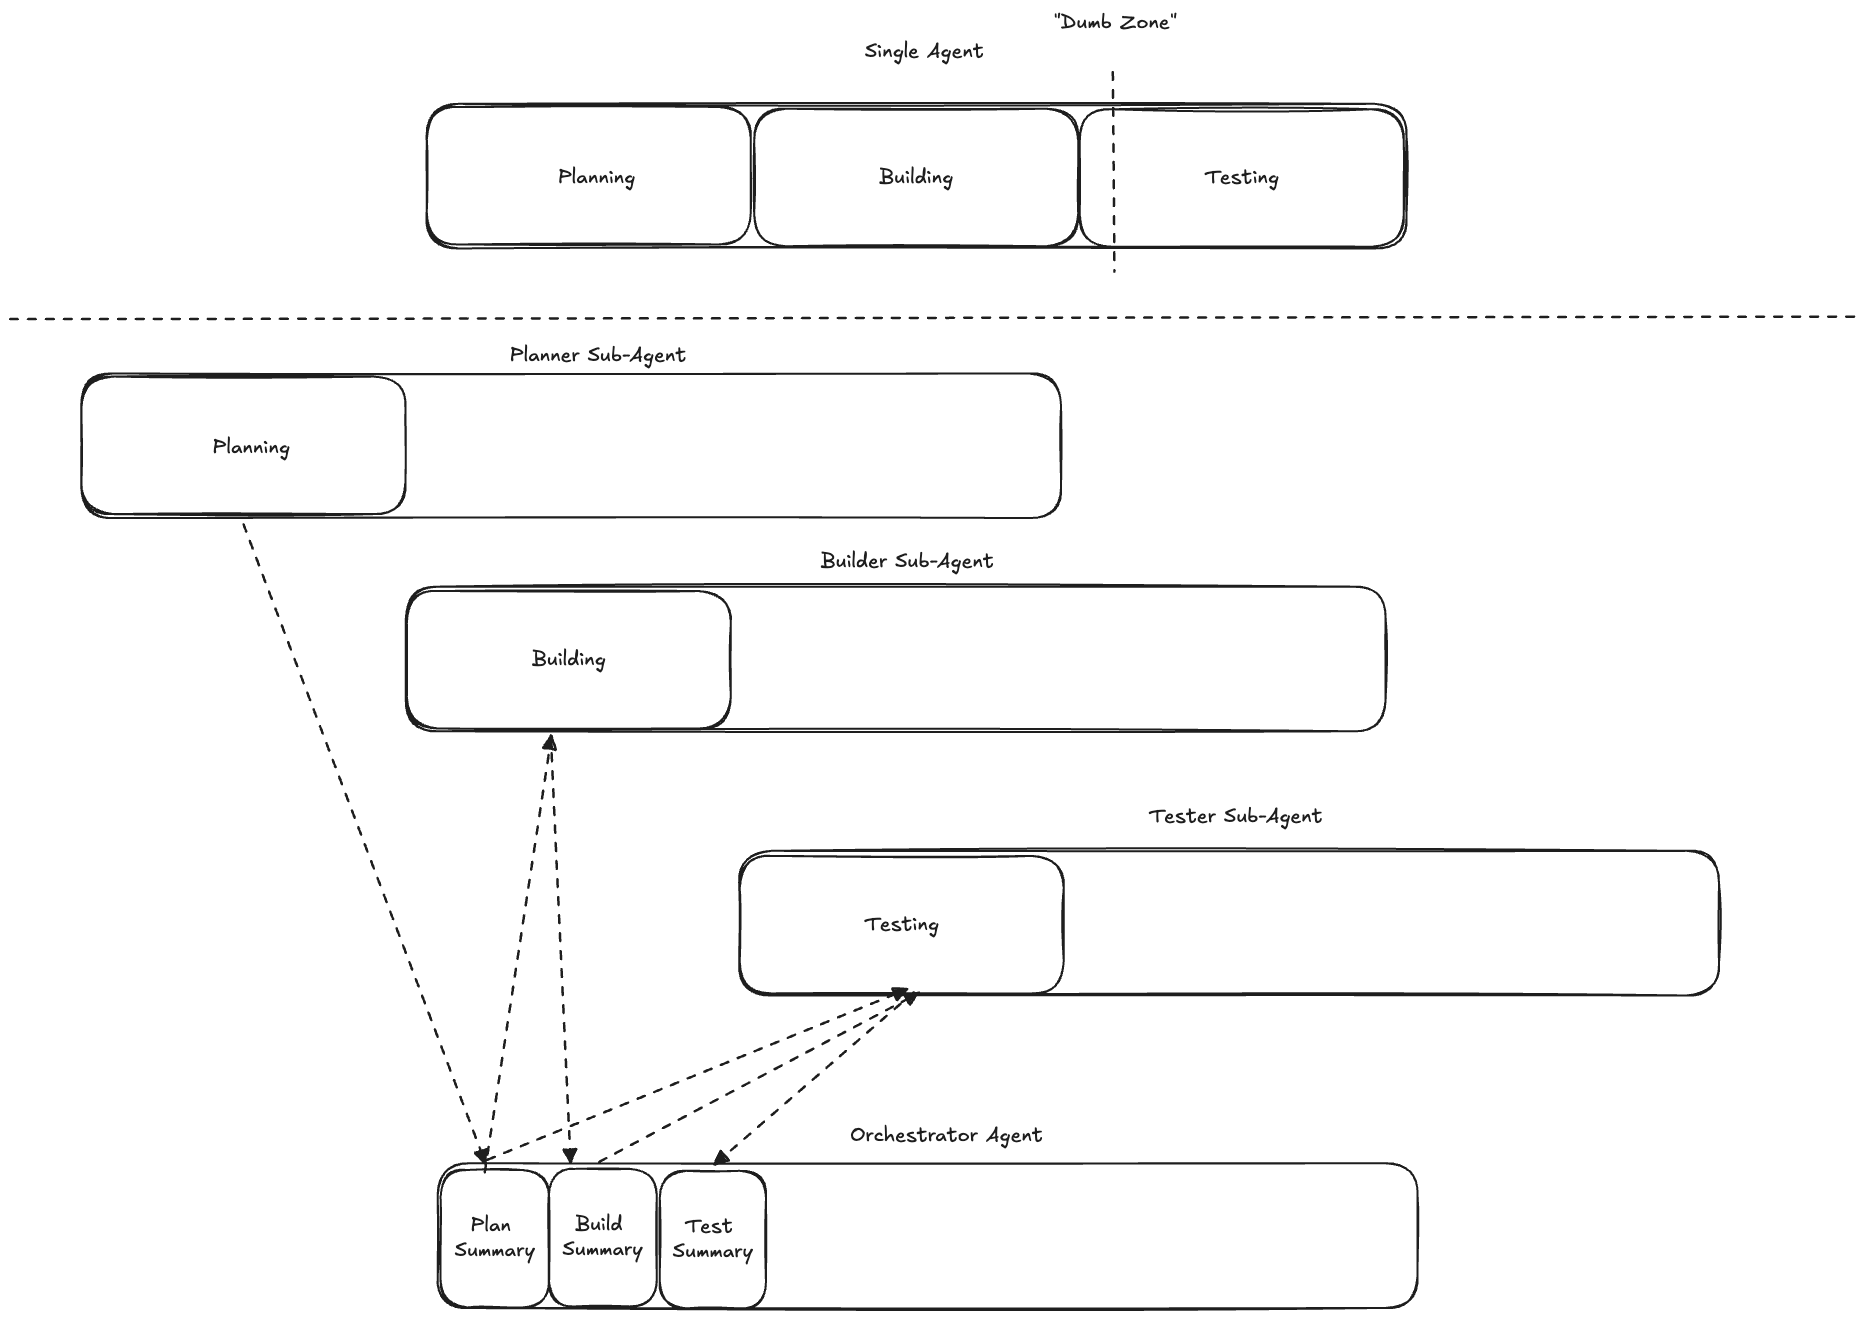
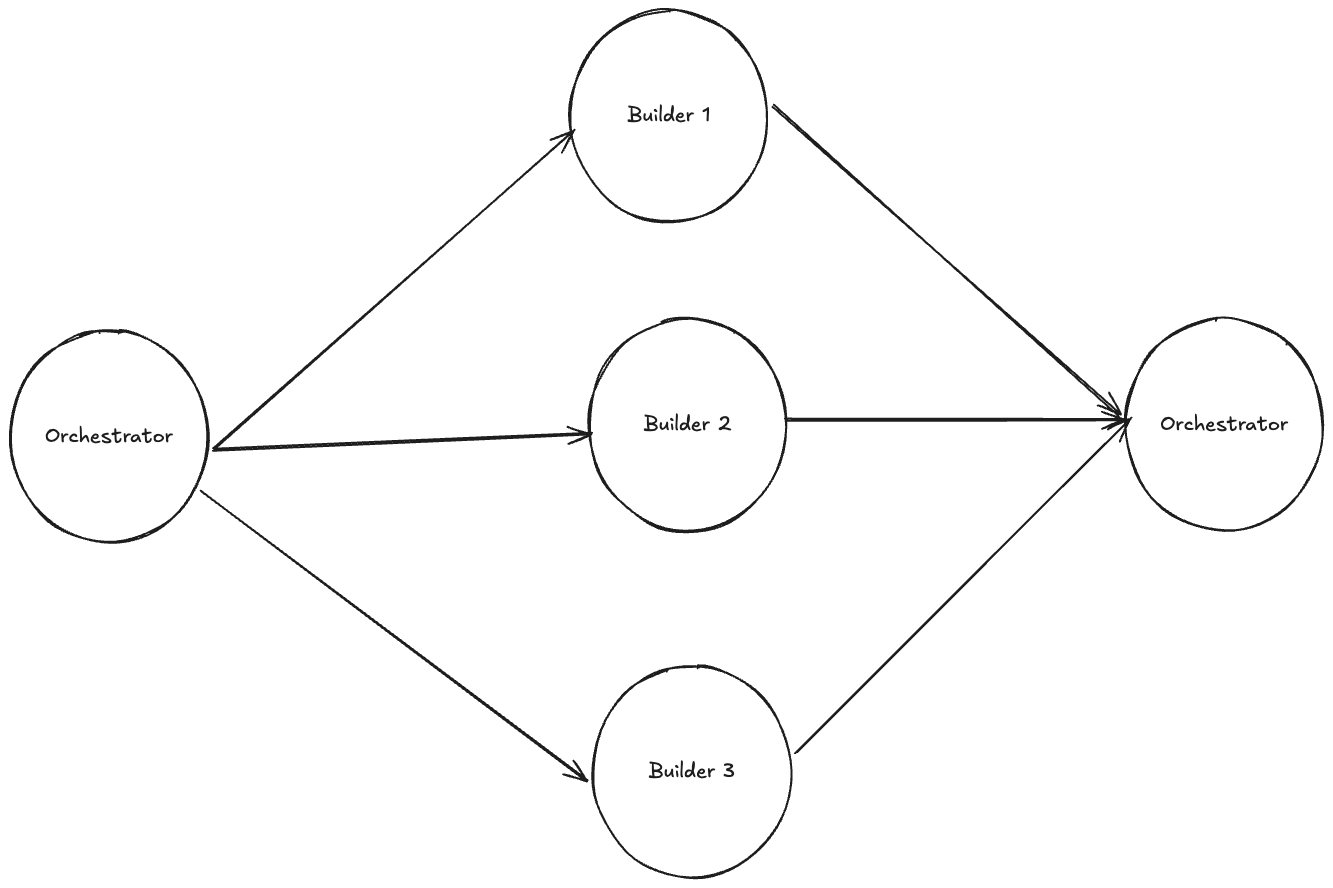
Additionally, sub-agents open up the possibility for parallelised workflows, where an orchestrating agent can simultaneously delegate multiple subtasks to sub-agents running in parallel.
Model Context Protocol (MCP) Servers
Model Context Protocol is a client-server protocol designed specifically with LLMs in mind. Rather than having an agent have to learn the idiosyncrasies of many rest APIs, instead with MCP the agent can use a standardised interface. In fact, many MCP servers act as wrappers around REST APIs. These standardised interfaces expose the following primitives to the LLM:
- Prompt Templates
- Tools
- Resources
MCP was revolutionary when it first came out. However, as time has progressed, I believe better patterns have developed for the first two primitives. I don’t believe prompt templates belong in a third party service, these are usually highly specific to individual projects and workflows, this primitive is much better served by slash commands. As with normal agent tools, MCP tools face the problem of schema bloat. Indeed, MCPs exacerbate this issue, since it is very easy to enable tens of MCP servers and rapidly bloat your initial context. I believe skills have emerged as a better pattern for extending a models capabilities, due to their progressive disclosure model. However, I do still believe that MCP servers offer value via their resource primitive, i.e. they offer an effective method for connecting your agent to third party data sources, which can be used to dynamically fetch up to date data.
Hooks
Hooks let you interrupt your coding harness to execute code whenever some specified event occurs. This can be used to add deterministic behaviour to your agent, which is especially useful as a means of enforcing permissions. The following is a list of common hook events and some examples of possible use cases:
- PreToolUse Hook
- You could screen the tool name being used relative to some blacklist
- You could also screen for specific types of files like
.env
- PostToolUse Hook
- Decoration - You could decorate a third party tool with functionality you want to perform after the tool is complete
- Stop Hook
- Notification - You could have some kind of notification be sent once work was complete
- SubAgentStop Hook
- Logging - You could log higher verbosity information than your sub-agent hands back to your primary agent. You could even allow your primary agent to read these logs if required, i.e. taking a progressive disclosure approach
Harness Engineering
Harness Engineering is currently at the cutting edge of AI-coding, it refers to the practice of building workflows and automations on top of harnesses. The simplest example of such a workflow is a Ralph Loop. The idea behind this is to run your harness in a while loop, at the start of each iteration it references a prd.json (product requirements document) detailing a list of features. Each feature will have a description, validation criteria and a status. The harness then instructs an agent to select exactly one feature to work on based on this document. Once it completes its selected feature it will change the status of the feature in the prd.json document. Then it will update a progress.md file with any artefacts/discoveries it wants to leave future iterations of the loop.
Harness Engineering as a NameI first came across this term when watching an interview with Geoffrey Huntley, the creator of the “Ralph Loop”, where he jokingly pleaded with the interview not to refer to this practice as Harness Engineering [5]. However, for lake of a better term I will be going against the creator’s wishes.
The following is an adapted implementation of a Ralph Loop [7], which makes reference to the previously defined agent/harness definitions in the background section:
#!/bin/bash
set -e

if [ -z "$1" ]; then
  echo "Usage: $0 <iterations>"
  exit 1
fi

read -r -d '' prompt <<'PROMPT'
@prd.json @progress.md
1. Find the highest-priority task and implement it.
2. Run your tests and type checks.
3. Update the PRD with what was done.
4. Append your progress to progress.txt.
5. Commit your changes.
ONLY WORK ON A SINGLE TASK.
If the PRD is complete, output <promise>COMPLETE</promise>.
PROMPT

for ((i=1; i<=$1; i++)); do
  result=$(harness "$prompt" "claude" "assistant")

  echo "$result"

  if [[ "$result" == *"<promise>COMPLETE</promise>"* ]]; then
    echo "PRD complete after $i iterations."
    exit 0
  fi
done
Geoffrey Huntley named the Ralph Loop after the Simpsons character Ralph Wiggum. This character is highly injury prone, and in order to enjoy the school playground he needs guard rails and safety signs to be put up everywhere. Comparing this to the Ralph Loop, Geoffrey Huntley advocates that you sit “in the loop” with your AI agent initially, assessing whether it is properly utilising its context to solve the tasks you present to it. When you spot it doing something unexpected, your initial objective might be to course correct it, but long term your objective is to dial in your context environment (slash commands, skills, agents, etc.) so that it does not make that mistake again. At some point you will have dialled in your context environment sufficiently such that you can step “out of the loop” and have your AI agent tackle problems autonomously. The promise of this approach is that once you have engineered your context environment to this level, you should be able to be tackling features in your sleep.
Avoid CompactionThe above is the correct way to implement a Ralph Loop. Importantly, it starts a new non-interactive coding session at the start of each iteration, i.e. a fresh context window. This is in contrast to the claude-code plugin for the Ralph Loop which relies on a long running single coding-session, utilising compaction when the context window gets too long.There are a number of problems with this approach. Firstly, it is fundamentally “human-in-the-loop”. Additionally, your ability to eventually step out of the loop is reduced due to compaction being a lossy and probabilistic procedure. You cannot discern whether your model got better at handling tasks because you dialled in your context environment, or if compaction occurred favourably this iteration. Finally, I would argue compaction only works well for users who are not optimising their context window, i.e. performing context engineering. This is because the signal-to-noise ratio degradation associated with compacting a coding-session with an initial prompt like “cursor fix this” is not going to be significant. In contrast, if you have been maximising the signal-to-noise ratio of your initial prompts, e.g. well crafted specs, then you run the risk of a compaction operation significantly diluting this high signal-to-noise ratio starting point with irrelevant intermediate context, e.g. thoughts and tool calls for unrelated previous features.
References
- Willison S. I think “agent” may finally have a widely enough agreed upon definition to be useful jargon now [Internet]. Simon Willison’s Weblog. Available from: https://simonwillison.net/2025/Sep/18/agents/
- Be clear, direct, and detailed [Internet]. Claude API Docs. Available from: https://platform.claude.com/docs/en/build-with-claude/prompt-engineering/be-clear-and-direct
- Liu NF, Lin K, Hewitt J, Paranjape A, Bevilacqua M, Petroni F, Liang P. Lost in the middle: How language models use long contexts. Transactions of the association for computational linguistics. 2024;12:157-73.
- Hong K, Troynikov A, Huber J. Context rot: How increasing input tokens impacts llm performance. URL https://research. trychroma. com/context-rot, retrieved October. 2025 Jul;20:2025.
- Geoffrey Huntley. Ralph Wiggum (and why Claude Code’s implementation isn’t it) with Geoffrey Huntley and Dexter Horthy [Internet]. YouTube. 2026. Available from: https://www.youtube.com/watch?v=O2bBWDoxO4s
- IndyDevDan. Elite Context Engineering with Claude Code [Internet]. YouTube. 2025. Available from: https://www.youtube.com/watch?v=Kf5-HWJPTIE
- 11 Tips for AI Coding with Ralph Wiggum [Internet]. Available from: https://www.aihero.dev/tips-for-ai-coding-with-ralph-wiggum